
Learning to read banjo tabs is an essential skill for any beginner banjo player. Banjo tabs are a type of musical notation that represents the finger placement on the banjo strings. In this article, we will guide you through the process of reading banjo tabs.
Check out these free Banjo tabs to get you going!
How To Read Banjo Tabs
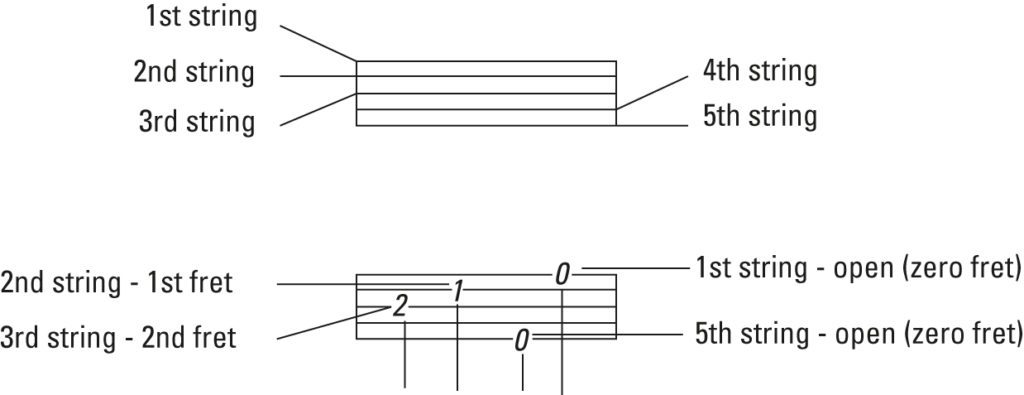
- Understanding Banjo Tablature Banjo tablature, also known as “tab,” is a type of notation that uses numbers to represent the frets on the banjo strings. The tablature consists of six lines, each line representing a string on the banjo. The top line represents the first string (the one closest to the floor), and the bottom line represents the sixth string (the one closest to your face).
- Identify the Notes Each number on the tab represents a specific note on the banjo string. For example, if you see the number 2 on the third line, it means you should play the note at the second fret on the third string.
- Pay Attention to Rhythm Banjo tabs not only indicate which notes to play, but also the rhythm of the song. This is done through symbols such as dashes, dots, and other special characters. These symbols indicate how long each note should be played and when to pause.
- Look for Chords Banjo tabs may also include chord diagrams that indicate the finger placement for a specific chord. These diagrams are usually found at the beginning of the tab or above the specific part of the song where the chord is used.
- Practice with Easy Songs The best way to learn how to read banjo tabs is to start with easy songs. Look for songs that use simple chords and easy-to-follow melodies. You can find many banjo tabs online, or in instructional books and DVDs.
- Memorize the Tab Once you have learned how to read banjo tabs, it’s important to memorize them. This will allow you to play the song without having to constantly refer to the tab.
- Play Along with Recordings Playing along with recordings is a great way to improve your banjo playing skills. Listen to the song and try to follow along with the banjo tabs. This will help you develop a better sense of timing and rhythm.
- Take it Slow Learning how to read banjo tabs can be challenging, especially if you are new to playing the banjo. Take your time and practice slowly. Focus on accuracy and rhythm, and gradually increase your speed as you become more comfortable with the song.
In conclusion, learning how to read banjo tabs is an important step in becoming a proficient banjo player. By understanding the basics of banjo tablature, identifying the notes, paying attention to rhythm, looking for chords, practicing with easy songs, memorizing the tab, playing along with recordings, and taking it slow, you can improve your banjo playing skills and enjoy playing your favorite songs on the banjo.
In this video by Banjo Ben Clark we teach you how to read Banjo Tabs. Ben takes you step by step through the process, teaching you how to read the notes themselves, and also how to get the timing of each note correct. Great for beginners.
Video Text:
0:00:12.1 –>
Welcome to banjo Ben Clark.com your own line home for learn how to pick on the Banjo the mandolin and the guitar today we are going to learn how to read tab okay so if even if you don’t play banjo this would be a good one to watch I’m going to do this for all three instruments but this is a great just theory lesson in general I teach most of the stuff here on the website obviously we have videos but I have tabs that accompany the videos and the tabs that I have a lot of people have trouble reading those it’s not standard notation I believe it’s a better way to teach than standard notation calm down out there are you classical people I’ve played nothing but classical piano from when I was four or five I’ll let through high school okay so I love standard notation I can read it the tabs are just
0:01:02.1 –>
better for bluegrass instruments so what we’re going to do today is break it way down okay and really there’s two different things that you need to know on how to read tap one is on learning how to put your fingers where it wants you to put your fingers on the left hand and then the second half which is perhaps more important is learning how to count and what the different notes mean okay so we’re going to be doing a lot of theory in this lesson you’re going to hang with me it’s it’s good stuff I make it fun for you and doing some exercises if you’re watching this on YouTube or Facebook here Lawal I’ll ask you to go over to banjo Ben Clark calm it’s the best bang for your buck learn how to pick and I hope that you do that and thanks to all of you who do support me through that allows me to put out videos like this each and every week let’s learn how to read tap on the banjo today we’re going to learn how to read tab now there’s a couple things that goes into learning how to read tab one
0:02:00.8 –>
of those is learning where to put our fingers on the fingerboard okay which strings together with our right hand but then the other half maybe the more important half of learning how to read tab is learning how to count okay now most bluegrass songs and most songs in general are in what’s called 4/4 time and that’s really easy to explain all that means is that each one of these measures let’s look there on the tab we see measure 1 3 measure 4 and you see there at the start of measure 1 there’s a 4/4 that means this song is in 4/4 time what that means is that no matter what tempo you’re going meaning what speed it could be a really slow song it could be Rocky Top going 100 miles an hour there’s still just 4 beats in each measure ok and we’re going to explain all the different kinds of notes that um that will use whole notes half notes quarter notes eighth notes and also
0:03:00.8 –>
we’re going to talk about rests and those types of things so we’re going to talk about the timing and we’re going to also learn about how to pick the strings and how to put our fingers when reading tab let’s start there for a second and measure one I just want to introduce you to the strings of the five string banjo and it’s standard G tuning and we have five strings okay and people often say it looks like the tab is upside down and at first it does seem like that I remember when I first started reading tab I thought this this is backwards because that string is on the bottom line but I’m playing my top string it should be flipped around well it may seem like that for the wall but I promise that you’ll very soon get over that you won’t even think about it before too long and you’ll find that it makes sense because the higher the pitch the higher the tab goes okay let’s
0:04:00.5 –>
explain that we’ve got five strings as I mentioned and not only do they have note names as you can see there at the start of measure one we’ve got G D G B D okay what they also have number names I’ll often say and you’ll often hear the fifth string or the third string or the second string okay so we need to learn that as well and so it’s good to know not only which note the string is but which number it is as well okay so that very first note that I have there measure one that’s a G note that’s this high g string known as your fifth string okay the next note measure one is our fourth string that’s our low D string measure two we’ve got our third string there which is a g string as well now notice we’ve already had a g-string so what’s the difference between these
0:05:01 –>
two they’re an octave apart high octave low octave okay so third string that second note measure two there is our second string it’s a B string so that’s a B note and then measure three that first note kind of wraps up the five string that we have on the five string banjo that’s our first string and it’s a denote as well and then I just drew coming you’ll notice if you look back at the star of measure one though we do have five strings on the five string banjo we only really have three different notes that we play look at that I’m starting from the bottom reading up measure one G D G B D so we have two G strings this is the same notes just different octaves an octave apart and then we have two D strings and
0:06:01.8 –>
then we have this one B strings in there now let’s talk about these different note lengths because we need to know how to count and so that we can read tablet starting they’re measure 5 we’re going to start off with the longest note that there is in music okay we’re in 4/4 time so the longest note is one that could take up the whole measure now how many beats did I say we’re in each measure in 4/4 time that’s easy there’s four beats so we have what’s called a whole note and that’s easy to remember because it takes up the whole measure and you as you can see there a whole note equals four beats that make sense right we have one note it’s equal to four beats if we only have four beats in a measure then that one note and that measure would fill up the whole measure okay now they’re easy to
0:07:00.7 –>
record recognize on tab because they don’t have a stem okay that’s the same when you’re reading standard notation as well they’re just the number is just sitting there as you can see a measure five I’ve got a whole note there on the third string on our g string and now beneath that note I’m going to start introducing which finger we’re going to play with with our right hand okay so you see that T in a circle that stands for thumb okay so if we were counting and this I’ve included the counts beneath each one of these measures this is very important that we learn how to count so no matter what our tempo is we know that this whole note takes up four beats and whenever I count you have two really two different options you can say that the tempo is dug up up about that fast you can either count one two three four or you can divide it up and this is
0:08:02. –>
what I’ll often do and I’ll throw it and in between each one of the down beats so one and two and three and four and that’s the same thing as just going one two three four okay so just playing measure five is very simple ready go one and two and three and four and that’s it we would move on to the next measure okay bond two and three and four and bam we’re done now measure six is the next note that we need to learn it’s a half note now if a whole note gets four beats what do you think a half note gets well it’s there for you to see it gets two beats okay so it takes now two half notes to fill up a full measure of four beats if they get two beats apiece all
0:09:02.2 –>
right now you can recognize those on tab because they have a stem at least on my tabs they have a stem that is broken okay the stem does not go all the way up to the note you see the little stem just sticks out beneath the staff right above the SERP the Circle T there okay so if I was going to play these two half notes okay I’m on my g string with my thumb and we’d go like this I’m going to count em measure inst so that we can establish our tempo and then I’m going to play these two half notes one and two and three and ready go one and two and three and four and okay pretty simple huh that’s two half notes by and two and three and four and good job now whenever
0:10:01. –>
we have a note we also have something that corresponds to it’s kinda like it’s cousin okay and that’s its rest and a rest is simply space that no notes are played in okay so just as you have a half note you can have a half note rest and all that means is is that there’s a space of two beats because it’s a half note rest that is going to be stuck in that measure and that’s what happens in measure seven the half of the measure I’ve got a half note on the g-string the zero just means that it’s open we’re playing no frets and then we have a two beat rest a half note rest following it so this measure would sound like this ready go one and two and three and four and okay and a half note one and two and half note rest four and
0:11:02.2 –>
there you go now measure eight I just inverted it so you can see what it sounds like there it’d be pretty pretty easy we’re going to start out with a half note rest and then play the half note on the g-string sounds like this one and two and three and ready go rest and two and three and four and all right not too bad huh how about we play measure seven and measure eight together okay and when we get to the rest I don’t want you to necessarily kill your strange mute it I just did that to let you know that it is a rest but a rest doesn’t always mean that you have to dampen the notes it just means that there’s nothing going on there okay it’s just filling in the time that has to be there okay so measure seven to measure eight together one and two and three and ready go one and two and three and four
0:12:03.7 –>
and one and two and three and four and see how that worked let’s now move on to quarter notes this is where it gets quite a bit more interesting you
More Banjo Articles
Banjo Picking for Beginners
Basic Right Hand Technique for Clawhammer Banjo
How to Wear Your Banjo Picks
Learn Basic Banjo Chords
Learn to Banjo Roll
Bluegrass Banjo Right Hand Technique
How To Tune Your Banjo
Books about Banjos
Best Microphone for Banjo
Best Banjo Pickups
All about Microphones and Pickup for Banjo